


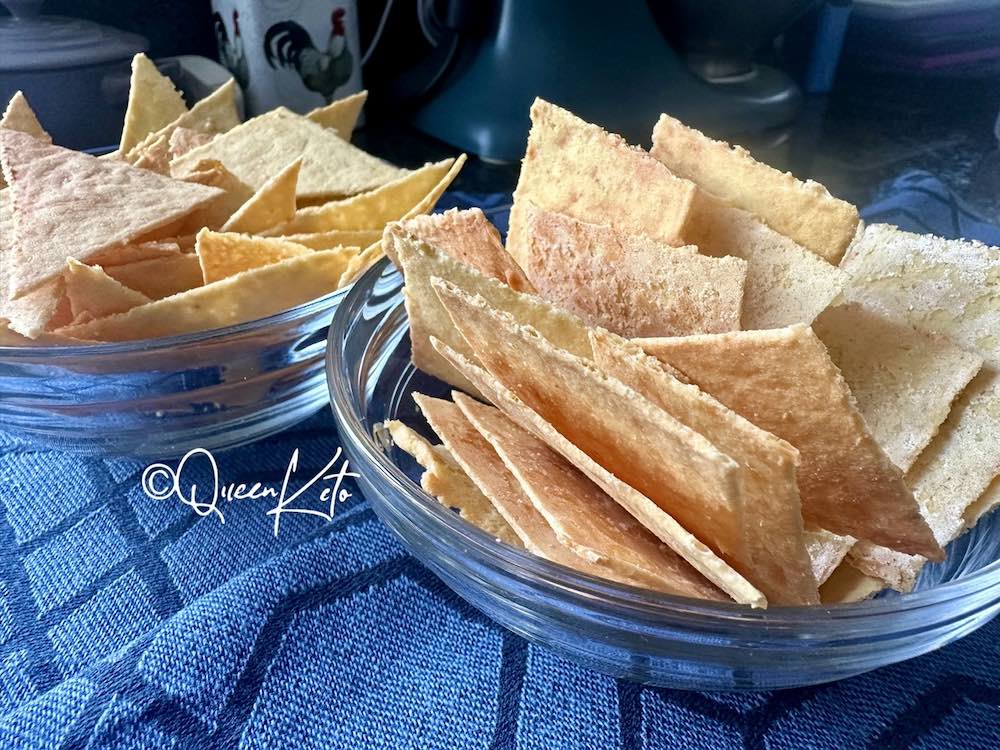
Keto Ready-Salted Crisps. This quick and easy High Protein snack is very similar to potato crisps, but with only 1.3g carbs per standard 28g serving.
However, unlike packaged crisps (or chips if you’re American), these contain healthy and simple ingredients. And won’t leave your fingers covered in cheap grease.
Obviously, you cannot replicate factory-produced crisps exactly, but you already know that compromises are essential on keto, right?
Try these crisps and see what your palate thinks. Mine is super-happy. I get the crunchiness that keto and ketovores often miss (me included) without resorting to eating junk. Happy days.
How to Make Keto Ready-Salted Crisps
This recipe is a modified version of my Super Crispy Parmesan Crisps. Those crisps are great for depth of flavour and umami, so perfect for snacking on their own.
This version is similar, but much, much milder, and you will not be able to taste cheese (unless my taste buds have died and I’m talking rubbish).
There are just 3 basic ingredients in this recipe: pre-shredded mozzarella, lupin flour and ground almonds. Salt and water complete the list.
Fun Fact: Do you know why they’re called “ready salted” in the UK? It’s because crisps were initially sold unsalted, and contained a separate blue paper sachet of salt that you added yourself. Those still exist in the UK, I think, and they’re called “Salt & Shake“. “Ready salted” simply indicates that the crisps have already been salted for you.
If you prefer flavoured crisps, be my guest. Add whatever spices or herbs you like. But I would urge you to test the plain Ready-Salted recipe first.
Just one thing to note. Normal ‘wet’ mozzarella or pizza ‘block’ won’t work. Pre-shredded mozzarella is readily available in all supermarkets. But check ingredients and carbs on the label, as there is a lot of variance depending on what additives manufacturers have included and in what quantity. Morrison’s (UK) is my favourite: just a bit of potato starch and 1.7g carbs per 100g.
The first step is to combine the dry ingredients well, pour in the water, and mix with a fork. In just one minute, the ‘dough’ will be ready for you to knead by hand. Make sure to wear a food-safe disposable glove, as it will be very sticky. Squeeze and turn for another minute, and it’s ready to roll out.
That was the easy part. Now comes the crucial part. Not difficult at all, but you need to be patient and do exactly as instructed.
Lay a large silicone sheet (or cut a piece to 37cm x 33cm, 18.5″ x 13″) on your counter and a piece of cling film (saran wrap) that is 2″ wider than the silicone sheet. You need the cling film to overlap so you can stick it down while you roll out the dough. If you don’t, the silicone sheet will slide about and cause you frustration.
Roll out to a transparent, 1mm thickness
Peel cling film away by keeping it parallel to dough
Slice using pizza wheel dipped in water
After baking, flip onto paper and place back in the oven to dry out further
Place the dough onto the silicone sheet, spread it out with your gloved hand, then cover with the cling film and start rolling. Begin in the centre and roll outwards, rotating the silicone sheet if it helps, until the entire surface is covered by a very thin, transparent layer of dough. If you see any opaque areas, roll out some more! You want the dough to be 1mm thick throughout and cover the entire silicone sheet area minus 1-2cm.
Grok generated image
Do not cut corners or lose patience during the rolling out step. Thicker crisps will not be as pleasant. Trust me on this.
The fun part is next. Use a plastic pizza wheel dipped in water and shaken. Slice across vertically and horizontally to make squares. Prefer triangles? Fine. Just slice the squares diagonally.
Finally, bake your crisps. Take them out of the oven, flip them onto a sheet of parchment paper and put them back in the oven (turned off, with door kept slightly open). Leave them there for at least 30 minutes. Then you can break them apart, allow them to cool completely, and they’re ready.
Make sure to store them in an air-tight container, where they’ll stay super-crispy for days.
Enjoy!
Cook ModeClick to prevent your screen from going dark
- set aside one of your oven racks, lay out your silicone sheet (pre-cut to 47cm x 33cm – 18.5 x 13”) and a piece of cling film (saran wrap) that’s 2” larger than the silicone sheet; pre-heat oven to 140°C.combine dry ingredients.
-
combine dry ingredients.
60 g mozzarella, 40 g lupin flour, 40 g ground almonds, ½ tsp fine himalayan pink salt
-
make a well in the centre and tip in the water.
65 g water
- mix with a fork for a minute, then wear a disposable, food-safe glove on your dominant hand and knead briefly to obtain a sticky, smooth dough.
-
transfer your dough onto the silicone sheet, flatten it with your gloved hand, then place your pre-cut cling film (saran wrap) on top; if you have a quartz worktop like mine (or other shiny surface), allowing the cling film to overlap will let you stick it down so the silicone sheet won’t slide about.
-
roll the dough outwards from the centre in all directions, stretching it out until transparent; if you see any areas that are more opaque than others, roll out some more; you want to cover the entire silicone sheet with no more than 1-2 cm free from the edges, to 1mm thickness; you will need to peel away the cling film and reposition it several times; to remove the cling film neatly, peel it away gently while holding it closely parallel to the dough.
- use a plastic pizza wheel (dipped in water with excess shaken off) to slice vertically and horizontally; if you want triangle shapes, create bigger squares and slice them diagonally.
-
slide the silicone sheet onto your oven rack and bake for 35 minutes.
-
remove the rack, turn off oven, and close the door.
-
flip the silicone sheet over a sheet of parchment paper (the crisps will be loosely attached, so do this with a swift action), and peel it away to leave the crisps upside down – no need to break them apart just yet.
-
slide the paper over your oven rack and put it back in the oven, door ajar, to let residual heat dry the crisps further.
-
leave them in for at least 30 minutes – they will naturally lift away from the paper.
-
remove them, break them up and, as soon as they’re completely cool, store them at room temperature in an airtight container.
Use Metric Kitchen Scales to weigh your ingredients accurately:
Food Scales UK
Food Scales U.S.
A pizza wheel with a plastic blade will not ruin your silicone sheet.
Storing these crisps in an airtight container will keep them crispy for several days.
Serving: 28g | Calories: 141kcal | Carbohydrates: 1.3g | Protein: 10.6g | Fat: 9.7g
This post contains affiliate links. As an Amazon Associate I earn from qualifying purchases. Whilst there is no extra cost for you, affiliation helps me buffer the expenses associated with running this site.


Leave feedback about this